Ok, a few things to start off. One, I haven't been logged on in a LONG time! If anyone out there is actually reading this, then I apologize...otherwise, on to new things!
I realize the Salad-In-A-Jar thing has been done, several ways, and by several people. However, I put one of these bad-boys in the fridge at work and had a great response. Although we all try to be healthy from time to time, I'm about the worst. I still remember this metabolism thing that existed in my youth...when I could eat anything and it didn't matter. My spot in the community fridge is not known for lettuce...but cheese, cheese related dips, Pepsi, Salami, and for a stretch that lasted right about nine months, Jello Mousse Pudding cups and Pork Chops. Salad does not occupy MY SPOT. Not that the salad I'm about to show off is exactly healthy per se, its a step up from my usual night shift snackies.
Plus, from a mommy and a full time shift worker, the handy factor gives this grab-n-go lunch lots of healthy points. Mental health.
Quick shout out to one of my most favorite things, before I get started. If you haven't looked into Bountiful Baskets, check it out at www.bountifulbaskets.org. Most of the produce I use in anything comes from these volunteers who do an amazing thing for families across the country. BB is a food CO-OP. Contributors (thats us) pay $15 for a conventional basket or $25 for an organic one. Ordering occurs on Mondays at various times depending on your state. Pickup times vary, but are usually on the following Saturday. The produce you get in your basket changes, but you always get an AMAZING value. They also have great add ons, like Italian or Mexican packs, bread (sorry fellow G-free-ers, not for us!) and seasonal cases of fruits or veggies. We eat healthier when there is fresh produce in the house...and we do it on a budget! Plus volunteering with them is a great way to meet new people! Check it out!
So, here is the basic ingredients list for my Salad in a Jar:
Canning Jar
Ranch Dressing
2 C. Chicken Broth
Garlic
1 C. Quinoa
Lettuce
Pea Pods
Onion
Cherry Tomatoes
Black Beans
Cheese
Carrots
Zucchini
Other good ideas:
Mushrooms
Green Peppers
Avocados
First things first, rinse your quinoa in a mesh strainer, then toss it in a pan with some olive oil and minced garlic. I like to cook it like that till the water from the rinse is pretty well evaporated. Your quinoa should be cooked in a 1:2 ratio (1 part quinoa, 2 parts liquid). Boil the quinoa till the liquid is gone. It should be fluffy and the little grains "Tails" should be unwound. You will know what I mean when you get there! Let it cool.
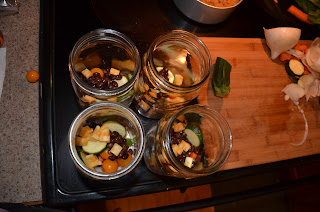
Get your jars and make a little assembly line. Get your veggies chopped how you like them. Add the dressing to the jar first (so it is on the bottom). Second add any hard veggies that won't get all mushy in the dressing. Things like the peppers, onions, carrots, Mushrooms, cherry tomatoes, etc.
Next add the more fragile items like avocados or cucumbers. After that I like to add the black beans (well drained) and cheese. Finally I add the quinoa (now nice and cool) and stuff in the chopped lettuce. Put on the lid, and pop them in the fridge.
Everything I read before said to really stuff the lettuce in there, less air means fresher salad, but if it isn't going to sit around that long, I wouldn't worry about it. My husband tries to eat his in a work truck, straight out of the jar, so less full is a better option for him. I have a desk job so I can just dump the whole lot on a paper plate.
*OPTIONAL INFO* I like to add chicken to the salad, but I keep it in a separate container till the day I want to eat it. Here's my nifty tip of the day:
Before starting the salad adventure, buy a Gfree rotisserie chicken at your local grocery store. Its quick, easy and really not much more than a raw chicken. Strip the meat from the bones while it is still warm (it comes apart easier that way) and put it in containers to accompany the salads. When you have most of the meat off, put the carcass in water in the crock pot on high for a while. Strain it with your mesh colander and Ta-da! Its not the healthiest method (hello salt!) but it makes for a really tasty and already seasoned chicken broth. PLUS now you have broth for your quinoa! Waste not, want not!


