Sunday, March 22, 2020

Gluten Free Elk Lasagna


Here's the thing, I forgot to take a picture of this lasagna when it was ooey-gooey and fresh out of the oven, so you, dear reader, will have to use your imagination. Trust me, it looked amazing! 

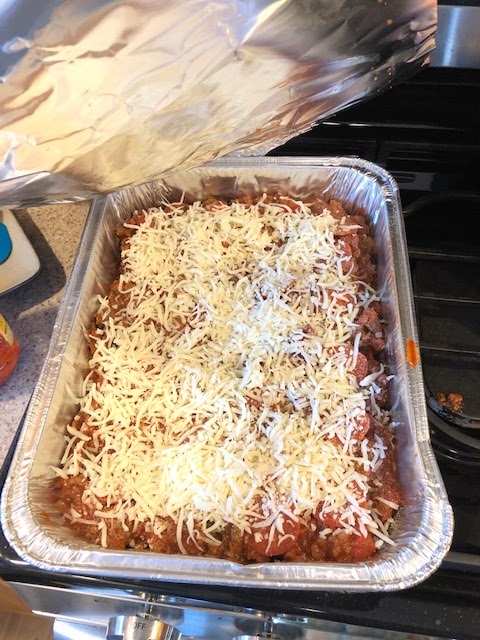
Lasagna just before it goes in the oven.

That being said, this lasagna recipe is pretty straightforward. Its an easy way to use up your game meat for those who aren't huge fans.  I've also made this with antelope and venison and both work just as well. Any and all measurements are approximate, and can be added to or subtracted from, depending on how you like your lasagna. If you want a saucier version, add more pasta sauce, a cheesier version, add more cheese! Don't like mushrooms? Take them out! If you aren't gluten free, regular oven-ready lasagna noodles will work just as well. 

Here is what you need to get started:

1 TBS olive oil
1-1.5 lbs Ground Elk
1 TBS white vinegar or similar 
Garlic Powder to taste
1 Onion (chopped)
1 Green Pepper (chopped)
l pkg Mushrooms (chopped)
2 24oz Jars of Classico Pasta Sauce
1-2 8oz bags of shredded mozzarella cheese 
1 pkg Pepperoni 
1 box Barilla Oven Ready Gluten Free Lasagna Noodles
Optional: 1 cup of ricotta cheese

Preheat oven to 425 degrees and find a lasagna sized pan.


In a deep frying pan, heat the olive oil, then add the elk meat. Sprinkle white vinegar over the meat as it starts to brown. After a few minutes, add the onions, green peppers and garlic powder. When the meat is almost fully cooked, add the mushrooms. Cook until there is no redness or pink remaining in the meat. 

Open the jars of pasta sauce and dump a small amount in the bottom of the lasagna pan (about 1/4 cup or less). Spread the pasta sauce so it barely covers the bottom of the pan. Dump the rest in the pan with the meat and mix it up well. 


While the pasta sauce is heating up with the meat, begin layering your noodles in the bottom of the pan. They may not line up exactly, so some overlap is allowed.


Spoon in enough of the meat/sauce mixture to over the lasagna noodles. Then add a layer of pepperoni to the top of the meat mixture. Top the pepperoni with a thin layer of mozzarella cheese.


Add another layer of noodles, then ricotta cheese if you so desire. (I desired but the store was out, so this version is sans ricotta). Then top with the rest of the meat and pepperoni again. Finally, use the rest of the mozzarella cheese to top the lasagna.

 Cover your masterpiece with foil and cook in the oven at 425 degrees for 40 minutes. Ta-da! You've got a fantastic lasagna!!


Note: I am asked all the time, how to make game meat taste less gamey. There are numerous tricks, however, I've found that my Mom's method of using vinegar as the meat browns is the best and easiest way.  I've also used rice vinegar, white wine vinegar and red wine vinegar with good results.  However, to those purists who love the unique flavor of wild game, leave out the vinegar!  

Tuesday, January 21, 2014

Gluten Free Rosettes


So I found this gem at the secondhand store today...and I started thinking...I could do this Gfree right?? I haven't had a Rosette since I was a kid, but I've always remembered that I LOVED them!


So here's the recipe:

2 eggs, slightly beaten
2 teaspooons sugar
1/4 teaspoon salt
1 cup milk
1 tablespoon vanilla 
1 cup flour mix (4 parts white rice flour, 2 parts potato, 1 part tapioca) Sifted is best but whatever...
1 teaspoon Xanthan Gum

Mix ingredients and beat till smooth, should be the consistency of heavy cream.

Fry at about 375 degrees. Cool, then add powdered sugar! Mmmmm 


Monday, September 16, 2013

Salad in a Jar

Ok, a few things to start off. One, I haven't been logged on in a LONG time!  If anyone out there is actually reading this, then I apologize...otherwise, on to new things!

I realize the Salad-In-A-Jar thing has been done, several ways, and by several people. However, I put one of these bad-boys in the fridge at work and had a great response.  Although we all try to be healthy from time to time, I'm about the worst. I still remember this metabolism thing that existed in my youth...when I could eat anything and it didn't matter. My spot in the community fridge is not known for lettuce...but cheese, cheese related dips, Pepsi, Salami, and for a stretch that lasted right about nine months, Jello Mousse Pudding cups and Pork Chops. Salad does not occupy MY SPOT. Not that the salad I'm about to show off is exactly healthy per se, its a step up from my usual night shift snackies.

Plus, from a mommy and a full time shift worker, the handy factor gives this grab-n-go lunch lots of healthy points. Mental health.

Quick shout out to one of my most favorite things, before I get started. If you haven't looked into Bountiful Baskets, check it out at www.bountifulbaskets.org. Most of the produce I use in anything comes from these volunteers who do an amazing thing for families across the country. BB is a food CO-OP. Contributors  (thats us) pay $15 for a conventional basket or $25 for an organic one. Ordering occurs on Mondays at various times depending on your state. Pickup times vary, but are usually on the following Saturday. The produce you get in your basket changes, but you always get an AMAZING value.  They also have great add ons, like Italian or Mexican packs, bread (sorry fellow G-free-ers, not for us!) and seasonal cases of fruits or veggies. We eat healthier when there is fresh produce in the house...and we do it on a budget! Plus volunteering with them is a great way to meet new people! Check it out!

So, here is the basic ingredients list for my Salad in a Jar:

Canning Jar
Ranch Dressing

2 C. Chicken Broth
Garlic
1 C. Quinoa

Lettuce
Pea Pods
Onion
Cherry Tomatoes
Black Beans
Cheese
Carrots
Zucchini

Other good ideas:
Mushrooms
Green Peppers
Avocados

First things first, rinse your quinoa in a mesh strainer, then toss it in a pan with some olive oil and minced garlic. I like to cook it like that till the water from the rinse is pretty well evaporated. Your quinoa should be cooked in a 1:2 ratio (1 part quinoa, 2 parts liquid). Boil the quinoa till the liquid is gone. It should be fluffy and the little grains "Tails" should be unwound. You will know what I mean when you get there! Let it cool.


Get your jars and make a little assembly line. Get your veggies chopped how you like them. Add the dressing to the jar first (so it is on the bottom). Second add any hard veggies that won't get all mushy in the dressing. Things like the peppers, onions, carrots, Mushrooms, cherry tomatoes, etc.


Next add the more fragile items like avocados or cucumbers. After that I like to add the black beans (well drained) and cheese. Finally I add the quinoa (now nice and cool) and stuff in the chopped lettuce. Put on the lid, and pop them in the fridge.


Everything I read before said to really stuff the lettuce in there, less air means fresher salad, but if it isn't going to sit around that long, I wouldn't worry about it. My husband tries to eat his in a work truck, straight out of the jar, so less full is a better option for him. I have a desk job so I can just dump the whole lot on a paper plate.


*OPTIONAL INFO* I like to add chicken to the salad, but I keep it in a separate container till the day I want to eat it. Here's my nifty tip of the day:

Before starting the salad adventure, buy a Gfree rotisserie chicken at your local grocery store. Its quick, easy and really not much more than a raw chicken.  Strip the meat from the bones while it is still warm (it comes apart easier that way) and put it in containers to accompany the salads. When you have most of the meat off, put the carcass in water in the crock pot on high for a while. Strain it with your mesh colander and Ta-da! Its not the healthiest method (hello salt!) but it makes for a really tasty and already seasoned chicken broth. PLUS now you have broth for your quinoa! Waste not, want not!


Friday, May 25, 2012

Cauliflower: He likes it!

I participate in Bountiful Baskets whenever I can and I absolutely adore the program. If you haven't heard of it before, check out their website at www.bountifulbaskets.org to see if they are in your area. The basic principle is every week you pick up a laundry basket full of fresh produce for about $15.  Half fruit and half veggies. The catch is, you don't know what you are going to get! It's really made me get creative in the kitchen, since often we get something we don't normally buy, and sometimes we get what I call "google-able" produce...which is something I can't identify!

This week I was trying to use a head of cauliflower. I have only eaten cauliflower one of two ways...raw and dipped in ranch, or steamed. I tried making it mashed...but unfortunately that did not score ANY Nom Noms on Nik's scale of Nummies. Hubby will eat it, but he doesn't love it. It rates higher than broccoli, but that's about it.

So I found an awesome sounding recipe for Balsamic & Parmesan Roasted Cauliflower from eatingwell.com. From there I made it "Nik Style" which from here out means I threw stuff in a bowl. Recipes are guidelines right?

Preheat the oven to 450 degrees F

So you need:
1 Head of Cauliflower
About 3 TBSP of Olive Oil (recipe calls for two, but I think I got more than that.)
Marjoram (I put in a bit more than the recipe called for on this too)
Salt
Pepper (I'm not adding amounts, as you know your taste preferences better than I do!)
Balsamic Vinegar (about 2 TBS give or take)
Shredded Parmesan Cheese

Now, I made an easy baked chicken breast at the same time. If you want to do that as well, you will need :
Boneless skinless chicken breasts (number depends on how many you want to feed)
Olive Oil
Garlic Powder (my secret ingredient)
Turmeric (I don't know that I really tasted this, but I read somewhere that its good for you, and I was experimenting so I thought, what the hey)
McCormick Mediterranean Spiced Sea Salt (My other favorite)

My chicken was still pretty frozen (last minute supper planning on my part) but I put it on a foil lined pan and spread some olive oil on them. I gave each breast a generous dusting of garlic powder, and then a slightly more modest amount of turmeric and the Mediterranean Sea Salt. 

Pop the chicken pan in the oven first, especially if it is frozen like mine was. It will take longer to cook than the cauliflower. 

Mix the cauliflower florets, olive oil, marjoram, salt and pepper in a big bowl. Mix well so there is a bit of oil on all the florets and the seasonings seem to be evenly spread. Put the mixture on a baking sheet and put it in the oven also.

Bake both pans in the oven at 450 degrees F for about 20 minutes. Remove the cauliflower from the pan and add the balsamic vinegar and Parmesan cheese.  Put it back in the oven for about 10 more minutes. Check your chicken for doneness and viola, dinner!  I threw some Parmesan on the chicken as well...hey it was there, and who doesn't like cheese with chicken?

Hubby liked it! He even ate a second helping of cauliflower. I'm going to chalk this one up as a success. The chicken was very juicy and tender, and although the cauliflower had some burn-y spots, it tasted fantastic! 


Wednesday, May 23, 2012

Gfree Pizza Bite Cups

Ok, so right up front, I did not invent this recipe, I found it on several different webpages. I'm so not even creative enough for that. However, I did love it, and with a few modifications, my family does too!

You will need a mini cupcake tin (which for some reason, I have, and I can't believe how many times I've used it this month).

Begin by rinsing about a cup of quinoa. I have a nifty mesh strainer for this, I'm not sure what its actually for, but its AMAZING for quinoa rinsing. Anyway, rinse it to remove the icky outer coating and you are good to go.

Put the newly rinsed quinoa in a pot with plenty of water and turn up the heat. A good rule of thumb is about 2 cups of water for every cup of quinoa, if you want all the water to be absorbed by the quinoa. You can always put in as much water as you want, and just dump any excess, but you can loose nutrients this way. The quinoa is done when its fluffier looking, paler, and almost looks like its sprouting something. This usually takes about 20 minutes or so.

While your quinoa is boiling away, use this time to cut up whatever you want as your pizza toppings. We opted for green pepper, onions, mushrooms and pepperoni. Chopping size depends on your preference, but remember, this is all going in a mini cupcake tin, so I cut it fairly small. Preheat your oven to 350 degrees.

I feel I have to note at this time that the spell checker on this thing is freaking out over my repeated use of the word quinoa. It has no idea what to do with it.

The recipe I followed called for one cup of mozzarella cheese, but honestly, for this family...not nearly cheesy enough. If you are going for a less healthy, lower fat snack, a cup will be plenty. Otherwise, I would add a bit more cheese.

Mix the cheese, all the toppings, two eggs, and the cooked quinoa to a bowl and stir! I added fresh oregano, basil and garlic, along with some random "Italian seasonings" labeled spice jar and a bit of paprika as well.

Use a tablespoon to put the mixture in the mini cupcake tins. GREASED cupcake tins. I can't stress that obvious point enough. I forgot on the first batch. Luckily my one-year-old-son doesn't care how they look. Use the spoon to compact the mixture into the cups, and fill it to the top. Cook for 15-20 minutes at 350 degrees.


Hubby recommends adding cheese to the top part way through the cooking process, I'll try that next time.  When the bites are done, serve them with pizza sauce for dipping.  I was very impressed and really liked them...Hubby, not so much. Maybe they were a bit too healthy to be called pizza?


Thursday, May 17, 2012

Breakfast of Champions

Ok, I stole most of this recipe from Shine (which is a great website for recipes, if anyone is wondering...)  but I think it needs to be posted again, and with slight gfree modifications!

Let'st just call this creation, "Breakfast of Champions" mostly because that is my favorite thing to call most breakfast... Especially ones that involve bacon!

You will need:
Bacon
Eggs
Cheddar Cheese
Gluten free bread (I opted for Canyon Bakehouse 7-grain Gluten Free Bread)
Non-stick substance (butter, Pam, whatever you like)
Muffin cake pan (a cupcake pan might do, but I think the bigger muffin pan worked better)
Seasonings/salt (whatever you like on eggs)

The recipe said not to use thick cut bacon...this didn't work for me for two reasons,
1. I only had thick cut bacon
2. Whats the point of skinny bacon???

So... I precooked the bacon in a frying pan first, till it was done, but NOT crispy. It needs to be pliable.  Set on paper towels and wait a few minutes till its cool enough you can fiddle with it, without burning your fingers off.

In the mean time, toast the bread in your dedicated gfree toaster. In retrospect, next time I do this I'll probobly throw a tiny bit of butter on the bottom of the bread...but I didn't when I made it this time. Since gfree bread is usually in smaller slices anyway, you really only have to cut off the corners to make it fit in the muffin tin.  Grease the muffin tins via your preferred method and stick the bread pieces in the bottom of each space (depending on how many you decide to make!)

Take your now moderatly cooled bacon and make a circle with it around the edges of each space. In the end your egg and cheese will be wrapped in bacon. If this explanation doesn't make sense, look at the picture at the end.

The recipe called for a tiny bit of cheese (only like a TBS or so). I did this, and we really couldn't taste the cheese. So, considering we are already eating thick bacon, and an egg...we may as well go all the way here. Put in as much cheese as you want, as long as you leave enough room for the egg.

Finally, crack one egg in each "bacon hole" and top with seasonings of choice.

Cook at 350 degrees until the egg is your preferred done-ness. I like runny yolks, hubby hates them. I meant to make his yolk free, and like an awesome wife...I forgot.


Monday, May 7, 2012

G Free Strawberry Margarita Cupcakes

   I found a recipe on Betty Crocker's web page for some Strawberry Margarita Cupcakes that looked fantastic! However, I need them to be gluten free, so I made some modifications and they turned out wonderfully!
    Now, I'm not usually a fan of Betty Crocker's gluten free mixes, but for this attempt I thought I would give them another try. I needed easy, since my one-year-old son thinks he needs to "help" with all things kitchen, AND he's going through a "clothing optional" phase. In other words, I'm planning for a half dressed heathen perched on the counter. Easy is good.
   With that said, here is a Gme version!

1 Box of Betty Crocker Gluten Free Yellow Cake Mix
1 Stick (1/2 Cup) of Butter
2 Teaspoons Vanilla Extract
3 Eggs
2/3 Cup Liquid Strawberry Margarita or Daiquiri Mix
1/4 Cup (or less) Tequila

   I could only find my mini cupcake pan and papers, so we went with that. Besides, minis are easier for Little Man. I cooked them at 350 degrees until done. I really can't remember how long I cooked them for, the box says 18-23 min for regular cupcakes. I just cook them till they look done. Then I check them buy inserting a toothpick into the center. If it comes out clean, its done!

   I kept the frosting simple too, I combined regular white frosting in a can with a little bit more of the strawberry margarita mix. I don't have any fancy frosting supplies, so I just mixed them in a sandwich bag and cut a small slit in the corner. Viola! Fancy froster!

   I like the lime wedge garnish, so even though its optional, I added them.